Every time you flip a light switch, turn on your television, or plug in your smartphone, you are relying on the central nervous system of your home: the electrical panel. Often hidden away in a basement, garage, or utility closet, this unassuming gray metal box manages and distributes electricity to every circuit in your house. Select the best electrical panel upgrade Highlands Ranch.
However, as our reliance on power-hungry technology grows—from electric vehicles (EVs) and induction stoves to high-efficiency HVAC systems—older homes are struggling to keep up. When your system reaches its limit, an electrical panel upgrade becomes not just a luxury, but a critical necessity for the safety and functionality of your home.
This brings many homeowners to a critical crossroads. As you watch DIY home improvement videos online, you might wonder if tackling an electrical panel installation yourself is a viable way to save money. Alternatively, you might be leaning toward hiring a professional but want to understand exactly what you are paying for.
In this comprehensive guide, we will explore everything you need to know about upgrading your electrical system. We will break down the true capabilities of modern panels, the hidden dangers of obsolete systems, the realities of DIY electrical work, and why trusting a professional is often the best investment you can make for your home.
Understanding Your Home’s Electrical Demands
Before you can decide who should perform your electrical panel replacement, you need to understand why the upgrade is happening in the first place. The electrical demands of the average household have skyrocketed over the last few decades. A home built in the 1970s was designed to power a few standard appliances, basic incandescent lighting, and a handful of televisions. Today, that same home is expected to charge electric vehicles, run smart home ecosystems, and power massive kitchen appliances.
When to Increase Home Electrical Capacity
Knowing exactly when to increase home electrical capacity requires a look at both your current daily usage and your future plans. If you are planning a major kitchen remodel, finishing a basement, installing a hot tub, or purchasing an electric vehicle, your current panel will likely need an evaluation.
To determine your needs, an electrician will perform a residential load calculation. This calculation takes the square footage of your home, the wattage of your fixed appliances, and your heating/cooling systems to determine your total electrical draw. If your total draw exceeds 80% of your panel’s capacity, it is time for an upgrade.
200 Amp Service vs 100 Amp
One of the most common upgrades homeowners make is moving from a 100-amp service to a 200-amp service. But what does this actually mean?
- 100-Amp Service: This was the standard for homes built between the 1950s and 1980s. A 100-amp panel provides enough power for basic lighting, standard outlets, and a few 240-volt appliances (like a range or a dryer). However, if you try to run a central air conditioner, an electric oven, and an EV charger simultaneously, a 100-amp panel will trip.
- 200-Amp Service: Today, the National Electrical Code (NEC) generally recognizes 200 amps as the standard for new construction. When comparing 200 amp service vs 100 amp, the 200-amp panel gives you double the capacity. It provides a massive buffer, allowing you to run modern, high-draw appliances simultaneously without overloading the system. It also provides extra physical space (more breaker slots) for future additions.
For large luxury homes or properties with heavy commercial-grade shop equipment, you might even see upgrades to 320- or 400-amp services. However, for 95% of residential properties, a 200-amp upgrade hits the sweet spot of affordability and capacity.
Recognizing the Red Flags of an Outdated System
Your electrical system will usually warn you before it fails entirely. Ignoring these warnings can lead to inconvenient power outages, damaged electronics, or even catastrophic house fires.
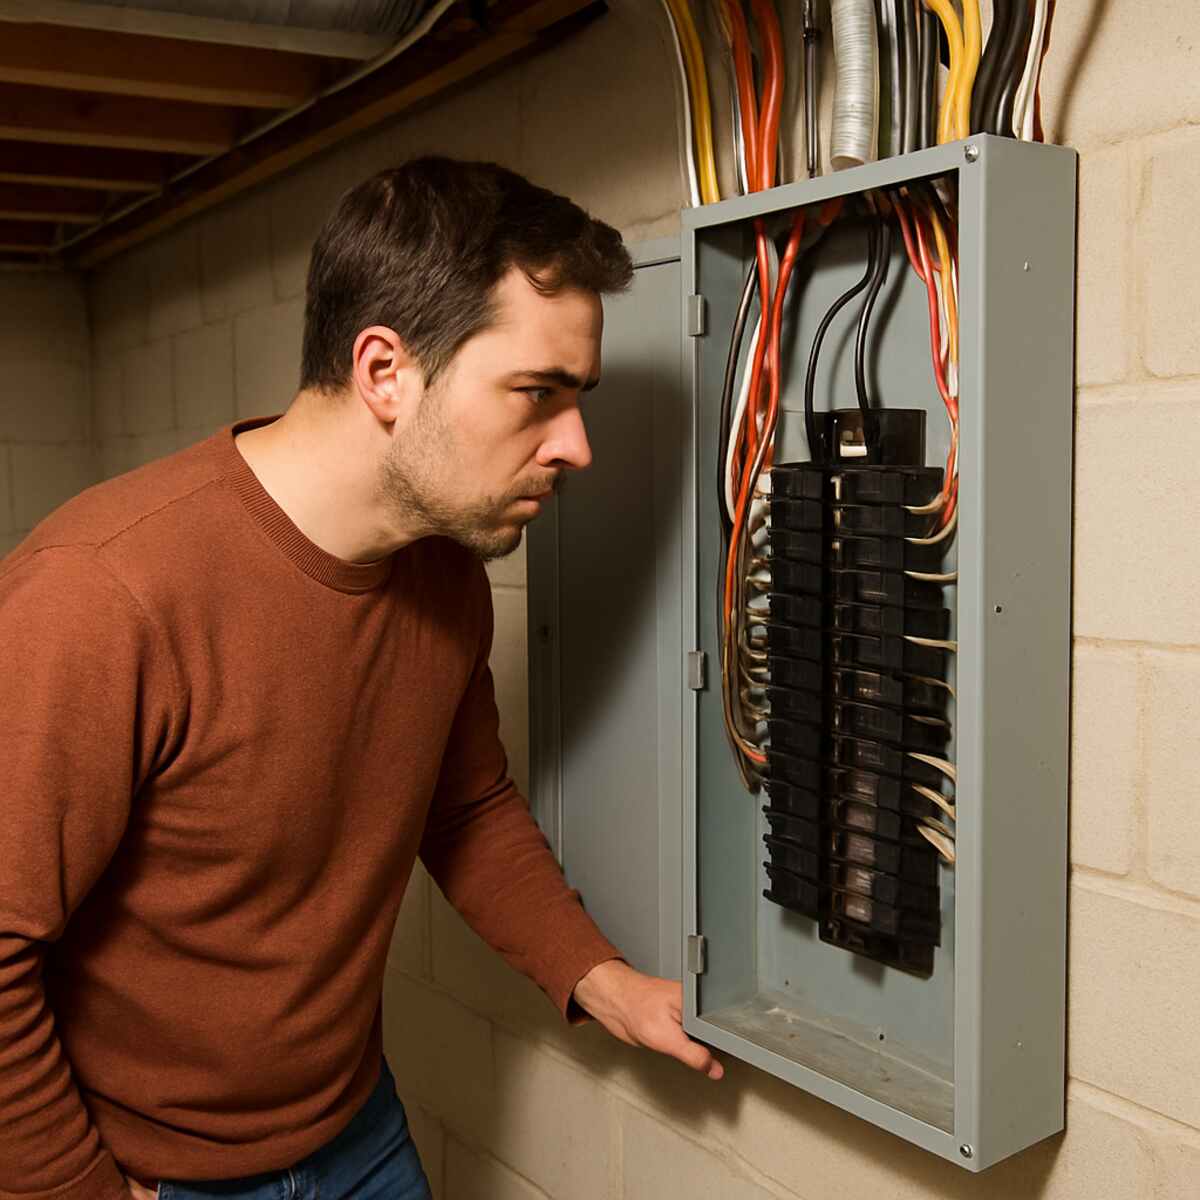
Signs of an Overloaded Circuit Breaker Box
It is vital to monitor your home for the physical and operational signs of an overloaded circuit breaker box. If you notice any of the following, your system is crying out for an upgrade:
- Frequent Breaker Tripping: Breakers are designed to trip when a circuit draws more current than it can handle. If you have to reset your breakers multiple times a month, the panel is overloaded.
- Flickering Lights: Are you experiencing flickering lights caused by an outdated electrical system? If your lights dim or flicker when the refrigerator compressor kicks on or when you start the vacuum cleaner, your panel is struggling to distribute power evenly.
- Warm or Buzzing Panel: An electrical panel should be completely silent and cool to the touch. A buzzing sound indicates electrical arcing, while a panel that is warm to the touch suggests that the wires are bearing too much current and generating dangerous heat.
- Burning Odors: A scent of melting plastic or burning metal near your breaker box is an immediate emergency. This means the insulation around the wires is melting.
- Rust and Corrosion: If water has found its way into your panel (often tracking down the main service cable from the roof), the internal components will rust. Rust impedes the flow of electricity and causes massive heat buildup.
- Melted Wires: If you or an electrician opens the panel and sees scorched or melted wires, an immediate electrical panel upgrade is required.

The Dangers of Old Fuse Boxes and Obsolete Panels
If you live in a historic home, you might still have a fuse box rather than a modern circuit breaker panel. Fuses work by melting a small piece of metal when the circuit overloads, thereby breaking the connection. While the underlying science of fuses is sound, the boxes themselves are outdated and extremely unsafe for modern loads.
Often, frustrated homeowners will replace a blown 15-amp fuse with a 20-amp or 30-amp fuse to prevent it from blowing again. This is incredibly dangerous. It allows 30 amps of electricity to flow through wires only rated for 15 amps, causing the wires inside the walls to heat up and catch fire.
If you are wondering about the cost to replace an old fuse box, it typically ranges from $1,500 to $3,000, depending on the complexity of the job. This upfront cost is negligible compared to the property damage and life safety risks associated with keeping an obsolete fuse system in your home.
Additionally, certain brands of early circuit breaker panels installed between the 1960s and 1980s—specifically Federal Pacific Electric (FPE) Stab-Lok panels and Zinsco panels—have been proven to be inherently defective. Their breakers frequently fail to trip during an overload, leading directly to panel fires. If you have an FPE or Zinsco panel, it is not a matter of if it will fail, but when.
The Great Debate: DIY vs. Professional Upgrades
With a wealth of information available on the internet, many handy homeowners naturally wonder if they can perform an electrical panel installation themselves. After all, DIY projects can save thousands of dollars in labor. However, when it comes to the main service panel, the stakes are unimaginably high.
The Appeal of DIY Electrical Work
The primary draw of a DIY electrical panel upgrade is, undoubtedly, the financial savings. An entirely new panel, complete with all necessary breakers, grounding rods, and wire, might only cost $300 to $800 in raw materials. When you compare that to a professional quote of $2,500 to $4,500, the temptation to do it yourself is strong.
Furthermore, some DIYers enjoy the challenge of learning a new skill and the satisfaction of upgrading their home with their own hands. For minor projects like swapping out a light fixture or replacing a standard wall outlet, DIY is perfectly acceptable—provided you turn off the power and follow basic safety rules.
Why the Main Panel is Radically Different
Upgrading a main electrical panel is not like changing a light switch. It is a highly complex, potentially lethal operation. Here is why DIY electrical panel replacement is strongly discouraged by every major safety organization:1. The Danger of “Live” Wires
When you turn off the main breaker in your panel, it cuts power to all the individual branch circuits in your home. However, the main service lugs feeding into the top of the panel remain completely live. These thick wires carry hundreds of amps directly from the utility grid. There is no breaker protecting them. If your screwdriver slips and touches a live lug and the metal panel simultaneously, the resulting arc flash can cause third-degree burns, blindness, or fatal electrocution. To safely replace a panel, the power must be completely disconnected at the meter by the utility company—something a homeowner typically cannot legally authorize on their own.2. The Complexities of the National Electrical Code
Electricians spend years as apprentices learning the National Electrical Code (NEC). The NEC is a massive, constantly updated volume of regulations designed to prevent fires and electrocutions. Are you familiar with the precise NEC requirements for service entrance equipment?
- Do you know the exact gauge of wire required for a 200-amp service over a specific distance?
- Do you know how to properly bond the neutral and ground wires in the main panel, but keep them separated in a subpanel?
- Do you know the required working clearances (usually 36 inches deep, 30 inches wide, and 78 inches high) for panel placement? A single code violation can result in a failed inspection, requiring you to rip out your work and start over.
3. Navigating Residential Building Permits for Wiring Updates
Almost every municipality in North America requires residential building permits for wiring updates, particularly for a service change. Pulling a permit requires submitting a detailed plan of the work. While some jurisdictions allow homeowners to pull their own permits, the resulting inspection by the city will be incredibly strict. If the inspector finds that the work is not up to code, they can refuse to let the utility company turn your power back on until a licensed professional fixes the mistakes. This could leave your family without electricity, heat, or hot water for days.
4. The Impact on Home Insurance Premiums and Claims
Your homeowner’s insurance policy requires you to maintain a safe living environment. If you perform an unpermitted, DIY electrical panel upgrade and a fire subsequently breaks out, the insurance claims adjuster will investigate. If they trace the cause of the fire back to your unpermitted DIY electrical work, your insurance claim will almost certainly be denied. You will be left entirely responsible for the cost of rebuilding your home.
Conversely, having a licensed electrician upgrade an old, dangerous fuse box can have a positive impact on home insurance premiums, as insurance companies view the modernized home as a significantly lower fire risk.
Hiring a Licensed Electrician for Panel Replacement
Given the extreme risks associated with DIY panel upgrades, hiring a licensed electrician for panel replacement is the only responsible choice. But what exactly does a professional bring to the table?
The Value of Professional Expertise
When you hire a master or journeyman electrician, you are paying for peace of mind. Professionals know how to correctly calculate load demands, balance the circuits inside the panel so that one side is not carrying a disproportionate amount of weight, and ensure perfect, tight connections. (Loose connections are a primary cause of electrical fires; professionals torque every breaker lug to the manufacturer’s exact specifications).
Furthermore, a licensed professional will manage all the frustrating red tape. They will coordinate directly with your local utility company to schedule the power disconnect and reconnect. They will pull the necessary permits and schedule the municipal inspections.
Understanding Average Labor Costs for Main Service Panel
The cost of a professional upgrade can vary widely based on your geographic location, the complexity of the installation, and the materials required.
To give you an idea of the investment, here is a general breakdown of costs:
- Permits and Utility Fees: $100 – $300
- Materials (Panel, breakers, wire, conduit, grounding materials): $500 – $1,500
- Labor: The average labor costs for main service panel replacements typically range from $1,000 to $2,500. Electricians generally charge between $75 and $150 per hour, and a full panel upgrade takes two electricians an entire day (8 to 10 hours) to complete safely.
- Total Average Cost: $1,600 to $4,300.
While this is a significant upfront cost, it is an investment that immediately increases the equity of your home. It makes the home easier to sell in the future, as home inspectors will flag an outdated panel immediately during a real estate transaction.
How to Choose the Right Electrician
Do not simply hire the first electrician you find online or the one who offers the lowest bid. The lowest bid often means corners are being cut. To find a reliable professional:
- Verify Licensing and Insurance: Ask to see their electrical license and proof of liability insurance and worker’s compensation.
- Ask About the Warranty: A reputable electrician will offer a warranty on both their labor and the materials they provide.
- Read Reviews and Ask for References: Look for consistent patterns of punctuality, cleanliness, and passing inspections on the first try.
- Get a Detailed Written Estimate: The quote should clearly delineate the cost of materials, labor, and permits. It should also specify the brand of panel they intend to install (brands like Square D, Siemens, Eaton, and Leviton are industry standards).
Modern Innovations: What a New Panel Offers
If you are going to invest in an electrical panel upgrade, you should understand the incredible technological leaps that have occurred in electrical hardware over the last decade. A modern panel does much more than just distribute power; it actively protects your home and helps you manage your energy consumption.
Preventing Electrical Fires with Modern Breakers
Standard circuit breakers, known as thermal-magnetic breakers, are designed to trip when they detect an overload (too many appliances running) or a short circuit (a hot wire touching a neutral or ground wire). While these are essential, they cannot detect a subtle, dangerous condition known as an arc fault.
An arc fault occurs when a wire is damaged—perhaps a nail was driven through a wire inside a wall, or an appliance cord was pinched under heavy furniture. Electricity “jumps” or arcs across the damaged gap. This arcing generates intense heat, upwards of 10,000 degrees Fahrenheit, which can easily ignite surrounding wood framing or insulation. Because the total current flowing doesn’t necessarily exceed the breaker’s 15 or 20 amp limit, a standard breaker will never trip during an arc fault.
This is where arc fault circuit interrupter installation comes in. AFCI breakers contain microscopic computers that constantly monitor the electrical waveform. If they detect the erratic, chaotic waveform characteristic of electrical arcing, they trip the circuit in a fraction of a second, effectively preventing electrical fires with modern breakers. The NEC now requires AFCI protection for nearly all living areas in new residential construction, and a professional panel upgrade will bring your home up to this life-saving standard.
Similarly, Ground Fault Circuit Interrupter (GFCI) breakers can be installed in the panel to protect wet areas (kitchens, bathrooms, outdoors) from electrocution hazards, ensuring that electricity isn’t taking an unintended path through water—or a person.
Whole House Surge Protection Integration
We often protect our expensive computers and televisions by plugging them into surge protector power strips. However, what about your smart refrigerator, your HVAC system, or your washer and dryer? Modern appliances contain sensitive circuit boards that can be easily destroyed by voltage spikes.
These spikes don’t just come from lightning strikes; they frequently occur due to fluctuations in the utility grid or when large motors inside your own home cycle on and off.
During an electrical panel upgrade, you have the perfect opportunity for whole house surge protection integration. A whole-house surge protector is wired directly into your new main panel. When a voltage spike enters the home, the device instantly shunts the excess voltage directly into the earth via the grounding system, protecting every hardwired appliance and outlet in your home. It is a relatively inexpensive add-on (usually $200 to $400) that offers massive financial protection.
The Benefits of a Smart Electrical Panel
If you want to future-proof your home entirely, you should consider a smart panel. Companies like Span and Leviton have revolutionized the humble breaker box, turning it into a brilliant piece of smart home technology.
The benefits of a smart electrical panel include:
- Energy Monitoring: Smart panels connect to your home’s Wi-Fi. Through a smartphone app, you can see exactly how much electricity each individual circuit is using in real-time. You can finally figure out exactly how much that old deep freezer in the garage is costing you per month.
- Remote Control: Did you forget to turn off the oven before leaving for vacation? With a smart panel, you can turn off individual circuits remotely from anywhere in the world.
- Dynamic Load Shedding: This is a game-changer for homes with battery backups or solar panels. If the grid goes down and you are running on battery power, a smart panel can be programmed to automatically shed non-essential loads (like the pool pump or the guest room AC) to ensure your battery can keep your refrigerator and medical devices running as long as possible.
- Seamless EV and Solar Integration: Smart panels are designed from the ground up to integrate seamlessly with green technology, making it easier to route solar power exactly where you want it.
Subpanel vs Main Panel Installation
In some scenarios, you might not need a complete electrical panel replacement. If your main panel still has sufficient total capacity (e.g., you already have a 200-amp service) but you have simply run out of physical slots for new breakers, a subpanel might be the ideal solution.
What is a Subpanel?
A subpanel is a smaller electrical panel that is fed power from the main panel. It does not connect directly to the utility grid. Instead, a large double-pole breaker is installed in the main panel, and thick feeder wires carry power from that breaker to the subpanel. The subpanel then distributes that power to several new, smaller circuits.
When to Choose a Subpanel
When weighing subpanel vs main panel installation, consider the following use cases where a subpanel excels:
- Adding Space: As mentioned, if your main 200-amp panel is full, a 100-amp subpanel placed right next to it can provide 20 or more new breaker slots for your growing needs.
- Home Additions: If you are building a large extension on your home, installing a subpanel in the new addition is highly efficient. Instead of running 15 separate wires all the way across the house back to the main panel, the electrician can run one large feeder wire to the addition, and then run the shorter, individual branch circuits from the local subpanel.
- Outbuildings and Garages: If you have a detached garage that you want to turn into a workshop, a subpanel is a must. It allows you to operate heavy power tools and provides local control so that if a breaker trips, you don’t have to walk back to the main house in the dark to reset it.
It is important to note that adding a subpanel does not increase the total amount of power coming from the utility company. If you have a 100-amp main panel and you add a 50-amp subpanel, your total capacity is still only 100 amps. If your total home usage demands more power, a main panel upgrade is mandatory.
The Upgrade Process: What to Expect on Installation Day
If you have decided to move forward with hiring a licensed electrician for your electrical panel upgrade, it is helpful to know what the process looks like. Preparing your home and knowing what to expect can make the day go incredibly smoothly.
1. The Pre-Work and Permitting
Before the work ever begins, your electrician will have visited your home to perform the load calculation, inspect the existing wiring, and provide a quote. Once you sign the contract, they will submit the plans to the city to secure the necessary permits. They will also coordinate a date with your local utility company.
2. Disconnecting the Power
On the morning of the upgrade, either the utility company or your electrician (if authorized by the utility) will disconnect the power at the meter outside your house. Your home will be completely without power for the entire day. Plan accordingly: keep the refrigerator and freezer doors closed to preserve food, have fully charged cell phones and power banks, and ensure you have flashlights if the work area is in a dark basement.
3. Removal of the Old Equipment
The electrician will carefully label every single wire coming into your old panel so they know exactly which circuit goes to which room. They will then remove all the old breakers, detach the wires, and unscrew the old metal box from the wall.
4. Installing the New Panel and Grounding
The new, larger panel box is mounted to the wall. At this stage, the electrician is also strictly adhering to NEC requirements for service entrance equipment. A massive part of this upgrade involves the grounding system.
In the past, homes were often grounded solely by attaching a wire to a cold water pipe. Today, modern codes require a far more robust system. Your electrician will likely drive two 8-foot-long copper grounding rods deep into the earth outside your home, spaced at least 6 feet apart. They will run a thick, continuous copper wire from your new panel, connecting it to the water meter and then out to these grounding rods. This provides a safe, direct path to the earth for stray electricity, drastically reducing the risk of lightning damage and electrocution.
5. Wiring and Installing Breakers
Once the box and grounds are secure, the electrician will pull all the existing branch circuit wires into the new panel. They will strip the wires, route them neatly (a sign of a great electrician is a beautifully organized panel), and connect them to the new breakers. This is when your new AFCI, GFCI, and whole-house surge protectors are locked into place.
6. Utility Reconnection and Inspection
Once the wiring is complete, the main service cables are connected to the new main breaker. The utility company returns to plug the meter back in and restore power to the home. The electrician will then turn on the main breaker, followed by each individual branch breaker, testing the voltage and ensuring every room in the house has safe, stable power.
Within a few days of completion, the municipal electrical inspector will visit your home to review the work. Because you hired a licensed professional who pulled the proper permits, this inspection should be a breeze, giving you the final stamp of approval on your home’s new heart.
Actionable Tips for Homeowners Post-Upgrade
Once your shiny new panel is installed, your electrical worries are largely over, but proactive maintenance will ensure the system lasts for decades.
- Label Everything Clearly: A good electrician will label the panel door, but take the time to verify it. Turn off one breaker at a time and walk through the house to see exactly what loses power. Create a highly detailed, typed legend for the panel door. Instead of “Kitchen,” write “Kitchen Outlets North Wall & Fridge.”
- Exercise Your Breakers: Once a year, you should turn every breaker in the panel off and back on again. This prevents the mechanical parts inside the breaker from stiffening up due to lack of use, ensuring they will trip quickly when a true overload happens.
- Test Your AFCIs and GFCIs: These special breakers have a small “Test” button on them. Press this button monthly. The breaker should instantly snap to the off position. If it doesn’t, the internal computer has failed, and the breaker must be replaced.
- Keep the Area Clear: Do not treat the area in front of your electrical panel as a storage unit. The NEC mandates a strict clearance zone. If an emergency occurs, you or a firefighter needs to be able to access that panel instantly without moving boxes of holiday decorations out of the way.
Conclusion
Your home’s electrical system is not something to be taken lightly. It works tirelessly, 24 hours a day, keeping your family comfortable, entertained, and safe. When signs of an overloaded circuit breaker box begin to appear—whether through flickering lights, tripping breakers, or an inability to support new appliances—an electrical panel upgrade is the definitive solution.
While the DIY spirit is a wonderful thing for painting walls or building garden beds, the main service panel demands profound respect. The extreme dangers of live utility lines, the strict legal complexities of building permits, and the risk of catastrophic fires make DIY panel replacements a gamble no homeowner should take.
By hiring a licensed electrician for panel replacement, you are investing in absolute safety. You unlock the ability to safely utilize 200-amp service, integrate incredible new technologies like smart energy monitoring and whole-house surge protection, and most importantly, you ensure that when you sleep at night, your home is protected by a modern, code-compliant electrical system.
Upgrading your electrical panel is one of the most significant, high-value improvements you can make to your property. Leave it to the professionals, and enjoy the peace of mind that comes with a perfectly powered home.